Monday 13 May 2013

VIRUS PROGRAMMING


VIRUS PROGRAMMING

Everybody is scared of computer ‘virus’ as it does harmful actions on our computer. But
when we look into the virus programming, we may certainly come out with the conclusion that it
requires intelligence to code a virus.

Logic

It is easy to mess-up the right program. For example, if you remove even a single byte
from an EXE file, that EXE file won’t be usable! Virus program don’t have any specific rules.
But it’s a common practice to include ‘signatures’ by virus creators. The main idea is to force the
innocent user to run the programs. So certain viruses come along with so called ‘programmer
utilities’ or ‘free tools’. Another thing is, it is easy to hang-up a working system using some ‘bad’interrupts. Viruses use this logic too!

TSR viruses

When TSR got its popularity, crackers started using TSR concepts for virus
programming. There was a time when people who knew TSR started writing their own TSR
viruses. But when Windows operating system was introduced, TSR viruses lost their
“popularity”.
I have written the following program. This is actually a TSR virus. It is not much
harmful; it just changes the attribute (color) byte of the existing characters present on screen.

#ifndef __SMALL__
#error Compile with Small memory model
#else
#include 
int i = 1;
char far *Vid_RAM = (char far *)0xb8000000;
void interrupt (*Int9)( void );
void interrupt MyInt9( void );
void interrupt MyInt9( void )
{
*( Vid_RAM + i ) = i;
if ( i>4000 )
i = 1;
else
i += 2;
(*Int9)( );
} /*--interrupt MyInt9-----*/
int main(void)
{
Int9 = getvect( 9 );
setvect( 9, MyInt9 );
keep( 0, 500 );
return(0);
} /*--main( )----*/
#endif


Windows viruses

When Windows operating system was introduced, much of the DOS based viruses lost
their “popularity”. Under Windows operating system, only certain viruses like “Boot sector virus”and “Disk formatting viruses” can do harmful actions. So crackers went for exploiting Windows.Windows based viruses exploit Internet ‘loopholes’. As VB Script even has access to Windows Registry, VB Script is commonly used for Windows/Internet based “spreading viruses”.

Anti-Viruses
As I said earlier, many virus programmers add signature to their program. So by
checking the signature, we can find the name of the virus. Most of the anti-virus packages use this
logic! The following table shows few viruses and their signatures.

Virus Signature
Einstein --------0042CD217231B96E0333D2B440CD2172193BC17515B80042
Phoenix 927 -----E800005E81C6????BF0001B90400F3A4E8
Spanz -----------E800005E81EE????8D94????B41ACD21C784
Necropolis ------50FCAD33C2AB8BD0E2F8
Trivial-25 ------B44EFEC6CD21B8??3DBA??00CD2193B440CD
Trivial-46 ------B44EB120BA????CD21BA????B80?3DCD21%2BA0001%4B440CD
SK --------------CD20B80300CD1051E800005E83EE09

So you can find that writing anti-virus package is not a tough job.
But understand the fact that checking out the signature is not 100% foolproof.

enjoy Hacking

post comment

All About Resource Hacker, Ultimate Windows Customization Tool


All About Resource Hacker, Ultimate Windows Customization Tool 


Resource Hacker is a small but excellent tool to modify system files like DLL, EXE, CPL, etc. You can even change Windows look by editing various Windows files and replacing their resources using Resource Hacker.
You can download it using following link:
 Download Resource Hacker 3.6.0
This tutorial will help you in understanding this tool and will teach you how to use it. For your convenience, we have divided this tutorial in 2 parts:
  • PART 1: BASIC INFORMATION
  • PART 2: ADVANCED INFORMATION
Part 1 provides basic details like viewing or replacing existing resources in a file, etc. Part 2covers some advance information for geeks, like adding new resources, using scripts, etc.

PART1 : BASIC INFORMATION
[Using Resource Hacker]
When you open a file in Resource Hacker, it shows various directories in left-side pane, like:
  • AVI - Contains AVI files
  • Cursor - Contains Cursor files
  • Bitmap - Contains BMP files
  • Icon - Contains Icons
  • Menu - Contains Menus
  • Dialog - Contains Dialog boxes
  • String Table - Contains Strings
  • Accelerators - Contains Shortcut keys
  • Version Info - Contains Version information of the file

[Viewing Resources]
You can view resource present in the file by expanding the directory given in left-side pane and clicking on the name of the resource. Each resource contains 3 important attributes:
  • Resource Type
  • Resource Name
  • Resource Language
[Changing Resources]
For Icons / Cursors / Bitmaps:
1. First select the resource ( e.g. Bitmap < 131 < 1033 ).
2. Now click on Action < Replace Icon or Cursor or Bitmap....


3.
 It'll open a new window, click on Open file with new Icon or Cursor or Bitmapbutton.
4. Select the desired resource using OPEN dialog box, click on Open button and then click onReplace button.
For Other Resources like AVI:
1. Click on Action < Replace Other Resource....
2. It'll open a new window, click on Open file with new resource button.
3. Select the file and click on Open button.
4. Now you'll need to provide following required information for the resource, which we mentioned earlier:
  • Resource Type
  • Resource Name
  • Resource Language

Resource Type:
 Mention type of the resource, e.g. if you are replacing AVI file, mention the type as AVI
Resource Name: Provide the same name of the existing resource which you want to replace
Resource Language: Provide language code for the resource, e.g. 1033 for English. You can check existing resource's language code.
5. At last click on Replace button.
[For Menus / Strings / Dialogs]
To change any String, Menu or Dialog box, Select the desired resource, e.g. String Table < 4 < 1033, make your changes and at last click on Compile Script button.


It'll immediately compile the script. If you made any mistake while modifying the resource, it'll generate error message so that you can fix it.

PART2 : ADVANCED INFORMATION

[Adding New Resources]
Adding New Bitmaps / Icons / Cursors / AVIs:
1. Click on Action < Add a new Resource....
2. Now click on Open file with new resource button.


3. Select the desired resource and click on Open button.
4. Give Resource Type, Name and Language as mentioned earlier. But keep in mind that Resource Name should not match with any existing resources name.
5. At last click on Add Resource button.
Adding New Menus:
Go to desired menu, e.g. Menu < 215 < 1033. Now add a new line anywhere inside POPUP ""using following format:
 MENUITEM "Custom_String", 12345, MFT_STRING, MFS_GRAYED | MFS_DEFAULT
Where:
  • "Custom_String" is the actual text which you want to show in menu.
  • 12345 is the identifier. It must be different from existing menuitems.
  • MFS_GRAYED disables the menuitem. You can change it to MFS_ENABLED if you want to show your menuitem enabled.
  • MFS_DEFAULT shows your menuitem in BOLD. You can omit it.
  • You can also add a new attribute in the code MFS_HILITE which automatically selects your menuitem.
In fact you can only add following new line in code:
 MENUITEM "Custom_String", 12345
And Resource Hacker will automatically insert other remaining values as mentioned above.
[Inserting Newly Added Resources in Dialog Boxes]
Once you finish adding new Icons / Bitmaps / AVIs, you can insert them in any dialog box so that you can show in various Windows dialog boxes like RUN, Progress Dialog box, etc.
1. Go to the desired dialog box, e.g. Dialog < 1020 < 1033
2. Right-click in the dialog box and select Insert Control option.


3.
 It'll open a new window. You'll see many controls in the new window, like BITMAP, LABEL, ICON, BUTTON, SysAnimate32 (for AVIs), etc.
4. Click on any desired control, e.g. to insert a Bitmap, click on the BITMAP control or to insert an AVI, click on SysAnimate32 control.


PS: You can also insert Date/Time in dialog box using SysDateTimePick32 control.
5. Don't forget to fill the Caption entry. You need to enter the Resource Name in Caption textbox, e.g. if you have added a Bitmap and set its Resource Name as 401, then give the same 401 in Caption textbox.


PS: For AVI Control ( SysAnimate32 ), you'll need to append # in Caption value, e.g if the AVI name is 144, then put #144 in Caption textbox.
6. At last click on OK button & then Compile the script. 
7. If you want to change the position of the new control in dialog box, simply click on the control and drag it to your desired location or you can also use arrow keys to move it.
Using Scripts in Resource Hacker
We can also run Resource Hacker using Command Prompt and can use scripts to automate lots of repeatative tasks to save our time.
You can use scripts in 2 ways:
  • Single Command
  • Multiple Commands
[Single Command]
You can use following commands in Command Prompt to perform actions using Resource Hacker:
 -add ExeFileName, ResultingFileName, ResourceAddress, ResourceType, ResourceName,
-addskip ExeFileName, ResultingFileName, ResourceAddress, ResourceType, ResourceName,
-addoverwrite ExeFileName, ResultingFileName, ResourceAddress, ResourceType, ResourceName,
-modify ExeFileName, ResultingFileName, ResourceAddress, ResourceType, ResourceName,
-extract ExeFileName, ResourceAddress, ResourceType, ResourceName,
-delete ExeFileName, ResultingFileName, ResourceType, ResourceName,
Where:
  • ExeFileName - Source file name
  • ResultingFileName - Output file name
  • ResourceAddress - Resource location (e.g. Bitmap path stored in your hard disk)
  • ResourceType - Resource type (e.g. Bitmap, AVI, etc.)
  • ResourceName - Resource name (e.g. 131, 1020, etc.)
Example:
 ResHacker.exe -addoverwrite explorer.exe, explorer1.exe, MyImage.bmp , bitmap, 143,
[Multiple Commands]
You can also run a series of commands using script. First you'll need to create the script file using Notepad and then you can run it using following command:
 ResHacker.exe -script ScriptFileName
Where, ScriptFileName is the name of the script file which you created in Notepad.
Following is the required format of the script file:
 [FILENAMES]
Exe=
SaveAs=
Log=
[COMMANDS]
-addoverwrite ResourceAddress, ResourceType, ResourceName
Where:
EXE= contains source file name
SaveAs= contains output file name
Log= contains LOG file name which will store a detailed log of the operation
[COMMANDS] section contains the command-set which we want to perform on the source file.
PS: You can omit the LOG= entry in script file. In this case, Resource Hacker will automatically create a LOG file with the name "ResHacker.log".
NOTE: If you are facing problems while saving a file after editing in resource hacker, then make sure you have disabled WFP (Windows File Protection) service using "WFP Patcher" or use "Replacer" to replace the file.
Also if you are getting error "Can't create file...", that means you have edited and saved the same file in past and there is a backup file which needs to be deleted before saving this file again. Go to the folder containing this file and you'll see a similar file having "_original" in its name. Delete it and try to save the file in resource hacker.
................................................................................
Enjoy...(Y)

How to make your Own EXE file


How to make your Own EXE file 

This is a tutorial where you can make your Own EXE Setup file of your Own. You can add as much number of Files you want and make an EXE File and send it to any friend so that he can extract and use the Application. You can create a Setup.exe and distibute Games, Software, Images and anything you want in a Single Executable file , rather than sending in Multiple File Formats.

Here is the Step by Step Tutorial of Making your own EXE file Easily.

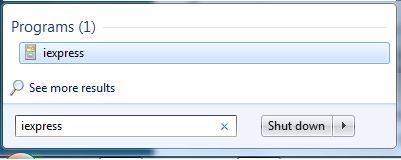
1. Navigate to the “Start” menu and select “Run.” Type “iexpress” (without quotes) and click “OK.” The IExpress Wizard will appear.


2. Select the “Create new Self Extraction Directive file” radio button and click “Next.” The Package Purpose dialog opens.


3. Select the “Extract files and run an installation command” radio button to create a package that will install a program after it extracts its files, or select “Extract files only” to create a package that simply compresses its contents. Click “Next.” The “Package Title” dialog opens.


4. Type in a title of the package into the text box. This will display the title on every dialog box the user sees when she extracts files from your Setup file. Click “Next.” The Confirmation Prompt displays.


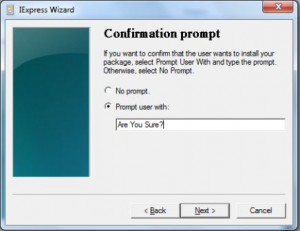
5. Select “No prompt” to skip confirming with the user that she wants to install your package, or select “Prompt user with:” and enter a message into the text box, such as “Are you sure?” Click “Next.”


6. Select “Do not display a license” to skip showing the user a license agreement she must agree to before installation, or select “Display a license” to show one and then click on “Browse” to find a text file that will display in a text window when the user installs the package. Click “Next.”


7. Click “Add” and navigate the dialog window that appears to the files you want to include in your package. Continue doing this until you have added all of the files you want to include and then click “Next.”


8. Select an installation program from the drop-down menu that appears if you selected to run an installation command and then click “Next.” Otherwise, skip this step.


9. Leave the default option selected in the “Show window” screen. Click “Next.”


10. Click the “Display message” option and type a message, such as “Extraction Complete!” to show the user when the package finishes installing her files. Click “Next.”


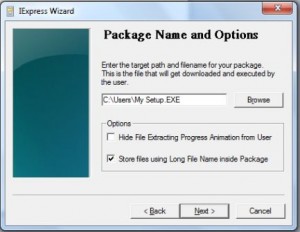
11. Type “Setup.exe” into the text box to name your package and select a location to save the file to, using the “Browse” button. Click “Next.”


12. Leave the default options selected in the “Configure restart” screen if you chose to use an installation command, then click “Next.” Otherwise, skip this step.

13. Select “Save Self Extraction Directive (SED) file,” which is a text file that contains a record of the package you are creating, or select “Don’t save” to not do this. Click “Next.”

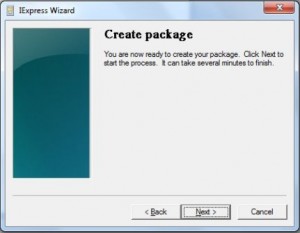
14. Click “Next” on the “Create package” screen to create your Setup.exe file. Click “Finish” to close the IExpress Wizard.
Finally you are your Own EXE is done . Save it and send it to your Friends to Exteact the Files inside it.
................................................................................
Enjoy...(Y)
And feel free to comment...

How To Fix BSOD Error Codes


How To Fix BSOD Error Codes 

Blue screen of Death (BSOD) is known as the STOP error. When Windows suffers from a serious error of non-recoverable nature, it stops immediately so as to prevent damage to the data or hardware. STOP error includes a STOP code which can be used to diagnose and possibly fix the problem.

BSOD error How To Fix BSOD Error Codes

List of few BSOD errors are given below

Stop 0x000000CE or DRIVER_UNLOADED_WITHOUT_CANCELLING_PENDING_OPERATIONS

It indicates that before exiting, a driver failed to cancel pending operations.

Fix
  • It might occur because of installing a faulty device driver/system device. Disabling or removing drivers (name is mentioned in the STOP message) resolves the issue. Using updated software also resolves the issue.
Stop 0×00000050 or PAGE_FAULT_IN_NONPAGED_AREA

This indicates that requested data was not in the memory. It happens when a reference to an invalid system memory address is done. Defective memory or incompatible software might cause this error.

Fix
  • If hardware is added recently, remove and replace it to determine if it was contributing to the problem or not.
  • If a faulty driver/system service is installed. Always use updated drivers and software to avoid this error.
Stop 0x0000009F or DRIVER_POWER_STATE_FAILURE

This indicates that a driver is in an inconsistent power state. 

Fix
  • It can occur after installing faulty applications/drivers/system services. We need to uninstall the particular application (name is mentioned in the STOP message)/ roll back the particular driver/ use updated version of the software.
Stop 0xBE or ATTEMPTED_WRITE_TO_READONLY_MEMORY

It indicates that a driver has attempted to write to read-only memory

Fix
  • It occurs because of installation of a faulty device driver/system services/firmware.  Try to use updated version of software to resolve this problem. If the driver name is mentioned in the STOP message, we have to remove the driver or have to use a possible update of it.
Stop 0X0000002E or DATA_BUS_ERROR

It indicates a system memory parity error. It is caused due to defective or failed RAM/incompatibility of memory hardware. Also when a device driver attempts to access an address in the range of 0x8xxxxxxx that does not exist, this error occurs. It can also indicate that virus or some other problem caused hard disk damage.

Fix
  • This error is mainly due to defective/malfunctioning memory hardware like memory modules, video adapter RAM. Remove and replace the hardware to find out its contribution to the error.
  • Hard Disk corruption is also a cause of this problem
  • Cracks, scratches or defective component on the motherboard can also cause this problem. Repair the motherboard.
  • It can also happen due to installation of faulty drivers or system services. If file name is provided in the error code, remove that driver. Also use updated version of software’s.
Stop 0x000000D1 or Driver_IQRL_NOT_LESS_OR_EQUAL

It indicates that the system has attempted for an access to a page able memory by using a kernel process IQRL that was too high. Improper addresses used by driver’s causes this error.

Fix
  • It might occur because of installing a faulty device driver/system device. Disabling or removing drivers (name is mentioned in the STOP message) resolves the issue. Using updated software also resolves the issue.
Stop 0x000000EA or THREAD_STUCK_IN_DEVICE_DRIVER

It is caused by a display driver making the system to pause indefinitely. Over here the display driver waits for the video hardware to enter an idle state. All this indicate a hardware problem with the video driver.

 Fix
  • It might occur because of installing a faulty device driver/system device. Disabling or removing drivers (name is mentioned in the STOP message) resolves the issue. Using updated software also resolves the issue.
I hope this article has helped you in understanding all about different types of BSOD errors and its’ fixes. So please give your suggestions and comments so that it can be improved more.
.........................................................................
Enjoy...(Y)
And feel free to comment...

Most Useful Adobe Photoshop Keyboard Shortcuts [Tips, Tricks]


Most Useful Adobe Photoshop Keyboard Shortcuts 

%tutke

Notes: I will be using ‘+’ - to define two or more keyboard combinations for example – CTRL + ALT + TAB etc.
I am using Windows, so if Your are using Macintosh – CONTROL = COMMAND 
command
and ALT = OPTION


Global keyboard shortcuts

1.You can check all Your preferences pressing CTRL + K and learn more.

2. Press TAB – to show/hide tool panels;

3. Press SHIFT + TAB to show/hide only Your palette;

4. Press F repeatedly to cycle screen modes;

5. Press CTRL + TAB to switch to Your next document;

6. Press CTRL + SHIFT + TAB to switch to Your previous document;

7. Press CTRL + T to enter free transform mode;

free-transform
Tip: You can scale proportionally from center Your transform by pressing and holding ALT + SHIFT, when You are dragging.

8. Press ALT + DELETE to fill the layer with foreground color or SHIFT + DELETE to fill with background color;

Tip: You can use ALT + BACKSPACE or SHIFT + BACKSPACE to fill non-transparent pixels.

9. Press to switch foreground/background color;

10. Press D to reset foreground/background color to black/white;

background-foreground-color
Tip: You can use ALT + DELETE shortcut to fill just current selection.

11. If You work in high zoom pressing and holding SPACEBAR comes very handy by giving You hand tool to move small distance.
Also You can use it greatly with the marquee tool (or rectangle, shape tool etc.) – just start dragging on the document,  and press  SPACEBAR while holding Your mouse and move it to desired place, resize as You want it and repeat circle until You are pleased;

rectangle-marque-tool

12. When You are working, there are lot of experimenting going on, so very handy becomes undo/redo shortcuts :
Press  CTRL + Z to undo/redo previous activity;
Press CTRL + ALT + Z to undo multiple times;

13. While working with big files, it is very important to save often (every 5-10 min) – pressCTRL + S to save Your document;

14. CTRL + ALT + SHIFT + S to bring up ‘save for web & devices ‘ dialog;

15. If You often use filters remember this keyboard shortcut, to repeat previous accomplished filter  : CTRL + F

filter

16. To draw precise, symmetrical  circle or square or straight line press and hold SHIFT,while drawing it.

precise

17. To temporarily switch to move tool while using another press CTRL + CLICK + hold you mouse

18. Open FILL dialogue by pressing SHIFT + BACKSPACE

fill

19. You can test Your fonts easily by selecting Your text, then selecting “set font family” form and just pressing UP or DOWN buttons.

testfonts

20. So how to approve and escape text editing mode? – easy. Just press Your numeric ENTER or CTRL + ENTER

21. Increase/decrease brush size pressing  [ or ] – (left bracket or right bracket)
Toolbar

22. Use Your toolbar shortcuts to switch between tools faster!
Memorize shortcuts of tools You use the most.

tools-menu
You can easily see keyboard shortcut by mouseover on certain tool :

tools-menu-description
Use Your Zoom 

zoom-tool

23. Double click on zoom tool to zoom Your document 100% size;

Tip: You can press CTRL + ALT + 0 to get actual pixels too (100 % size)!

24. Use keyboard shortcuts to zoom in/zoom out Your document:
Zoom in – CTRL + +
Zoom out – CTRL + -

zoom-keyboard
or
use Your mouse scroll wheel to zoom in/zoom out -  ALT + SCROLL WHEEL UP/ALT + SCROLL WHEEL DOWN

25.  To temporarily switch to zoom

zoom-tool
tool, while using another press: Quick zoom in: CTRL + SPACE + CLICK
Quick zoom out: ALT + SPACE + CLICK

26. Use keyboard shortcuts CTRL + 0 to set Your image fit to window;

27. Press CTRL + W to close just Your current open document;
Palette 

Note : check out  Your palette keyboard shortcuts pressing ALT + W

28. Layers menu
Note: press F7 to show/hide Your layers menu.

29. Press CTRL + SHIFT + N to create new layer with dialog box;

30. Press CTRL + SHIFT + ALT + N to create new layer without opening dialog box;

31. Press CTRL + ALT + J to duplicate active layer with dialog box;

32. Press CTRL + J to duplicate active layer without opening dialog box ;

33. How to navigate between layers:
Mouse click on active layer and press SHIFT to select several layers:

shift-layer
Press and hold CONTROL to select or deselect definite layers;

34.Press CTRL+G to group selected layers in one group:

Tip: use CTRL + SHIFT + G to ungroup layers

ctrl-g-layer
35. Collapse or expand all groups in Your layers palette by pressing CTRL + CLICK on the group’s triangle:

ctrl-click
ctrl-click-image
36. Show/ hide Your layers by and holding Your  mouse and dragging it up/down. Repeat to do inverse action:

visibility
37. To mask layers, do this trick – hold ALT + MOUSEOVER on the line between layers:

mask
38. Click and drag background layer to make duplicate. I suggest to use this action starting every new file:

background-copy
39. Press ALT + CLICK on

eye
icon – to show/hide all layers, except active one:

show-hide-all
40. Press CAPSLOCK to show cursor precise/standard mode;

41. Press CTRL + CLICK on layer

layer
to make selection:

control-click-selection
42. Press CTRL + I to inverse current selection;

43. Press CTRL + D to deselect current selection;

44. You maybe knew about deselect shortcut, but did You know how to reselect previous selection? Just press  CTRL + SHIFT + D !

45. Press CTRL + E to merge selected layers or press CTRL + SHIFT + E to merge all visible layers into one;

46. If You ever wanted to make  Your text longer or little bit shorter with tracking, You can do it easy with keyboard shortcuts – so first select Your text and then press CTRL + ALT + >or CTRL + ALT + < to set wider or thinner indent.

47. You can easily change Your layer or brush opacity

opacity
by just pressing number keys – 1 = 10%, 2 = 20%, 3 = 30% etc
................................................................................
Enjoy...(Y)
And feel free to comment...