Saturday 30 November 2013

How To Creating A Game With Notepad

Creating A Game With Notepad

You probably won't know what all of this means right now, but I'll explain it soon.

Introduction

Did you know that the simpleNotepad program on your computer is actually a very powerful programming tool? That's right, and it is also very easy to learn. In this article I'm going to show you how to make a simple game using only theNotepad program and a programming language called "Batch."
Batch is a language that runs primarily out of your Windows command prompt. Now, it's not even close to being the most powerful programming language out there, but it still let's you do enough to be extremely useful to know (at least for anyone in the computer field).
Not only is it useful, but it can also be used to create amazing text-based games! What is a text-based game you ask? It's a game (a very simple one) in which the user interacts through the use of text and choice-making.You will learn how to set up situations in which the characters will have to make choices about how they want to approach the problem.

A Few Quick Reminders

I want to go over a few quick things before we get in to the actual code. The first thing is that all of your commands should be kept on separate lines. So after you type something in, and are done with what is going to be on that line, hit the "enter" button on your keyboard to move to the next line.
The second thing I want to mention is that batch files read from top to bottom. This means that when you run a batch file, all of your code at the top will be interpreted and will run before your code at the bottom. This concept is what allows some of the things I'm going to teach you, to work. If for example you place a "echo" command and in the next line place a "cls" command, all of your text will be erased without your player getting to read it (this will make more sense later on).
If you ever have a problem and your game isn't working correctly, make sure you go back and ensure that you haven't made any of these errors.

Starting Up Notepad

Let's start by opening up Notepad:
Click on your start menu icon and go to "All Programs." A list of all the programs on your computer should appear, along with a file called "Accessories." Go in to the accessories folder and you should find Notepad, click on it to begin.
You should find Notepad in the Accessories folder.

You should find Notepad in the Accessories folder.

Code!

Now you're ready to begin typing your first lines of code, as well as learning you first commands. Commands are each of the words that we type in to the program that have a function; such as the echo, or pause commands.

@echo off, echo, echo. and pause

The first commands I'm going to teach you are very simple, however, they play an important part in the coding process (especially if you're making a game!).
@echo off - This command is used to remove all of the unnecessary text that can interfere with your game. It should always be added first; once it is added to a file, it does not have to be typed in again.
echo - echo is used to display regular text in your game. For example you can type: "echo Hello adventurer!", and the people playing your game will see is "Hello adventurer!" (So long as you typed in @echo off).
echo. - echo. (with a period) is used to create a blank line in your game. This can be useful in keeping your text uncluttered.
pause - This command is used when you want your players to take a break, and is used most often when you want to give them time to read some text. When you use this code it shows up as "Press any key to continue . . ." Your players can then press any key, when they are ready, in order to continue playing.
This is what your game should look like. Notice the long spaces between the text? This was done with the "echo." command. Also, note the pause command at work toward the bottom.
This is what your game should NOT look this. When you don't add "@echo off" this is what happens.
color 71 and "My Game" in the title bar.

cls, exit, title, and color

Ok, this next set of commands are all really simple as well, but are nice to have.
cls - cls is a command that I use a lot. It stands for "clear screen", and what it does is remove all of the text that has been made in the command prompt window (ergo, making the screen blank). This is a good tool when you want to keep your game looking clean and in order.
exit - This does exactly what it sounds like, it closes the game. You should only use this when the characters reach the end of the game, or if you want the game to close when they die or make a wrong decision.
title - title displays whatever you type after it in the title bar of the command prompt window.
color - color is a really fun command, and can be used to liven up your game. When you add the color code, followed by a space and a specific set of numbers or letter, you can change the colors of the command prompt window. For a list of the available colors see the picture below or open up the command prompt and type in "color/?".
You can access the command prompt by going back in to the accessories folder in the start menu. It should be in the same list as Notepad.
This is what you will get if you type "color/?" in to the command prompt.
This is about what you should be capable of doing at this point.

Let's Take A Break

Let's stop for a second and look at what we have so far. I've shown you several basic commands, and have taught you how to use them. Remember that each command should go on a different line (so hit "enter" after you finish with each command). Take a look at the picture to the right, so that way you can be sure that you know about what your file should look like.

goto

The "goto" command is simple, once you get to know it. The command is used when you want a player to jump to a different section of your game, such as when they make a certain decision.
It works this way:
You enter the "goto" command on a separate line, or at the end of an "if" statement (which we will go over later). You then specify a variable which will become the name of the destination. The name can be anything you want, and consists of the word(s) you type after "goto".
To specify your destination:
Move to a new line of code, directly above where you want your player to start. Type a colon ':' followed by the name of the destination.
example of a goto command.

set /p and if

These commands are the most advanced commands that I am going to teach you. They both have to be set up a specific way and also work with several other, smaller commands in order to function correctly.
set /p variable- This command is used when you want your player to insert a variable (a varying answer). This could be anywhere from their name to the name of a weapon or even the answer to one of the choices you have given them. Often times this variable will be referenced later, and therefore must be given a name. The name can be whatever you want it to be (but remember that you may be typing it in a lot when making your game). I think it would be easiest if I gave you some pictures showing you how to create variables.
set /p name=
set /p name=
See how I use the "echo" command to ask my player what his name is? I then go ahead and type:
set /p name=
This is where my player will type his name. "name" In this line is my variable. In a sense what we are doing is setting (set) a variable (name) to equal (=) whatever the user types.
We can reference this variable later by placing the name of the variable within two of the '%' symbols. For example:
echo Hello %name%, my name is Tom.
This will feed whatever the player typed in, back to him in the form of text.
Here is what happens when a player types in his name, then you feed that name back to him with the echo command.
if - this command is used when we create if/then statements. We can use it in conjunction with "set /p" in order to create choices for are players.
  1. Ask the player a question with the "echo" command. Make sure to clearly state their options.
  2. Give them the ability to enter an answer with the "set /p" command.
  3. Create "if" statements that allow the players' choices to have consequences, and that allow the story to continue.
"if" statements are used with "equ" and "neq" which mean "equals" and "doesn't equal", respectively.
This is how your statements should look:
:start
echo YES or NO?
set /p variable=
if %variable% equ YES goto situation1
if %variable% equ NO goto situation2
if %variable neq YES goto start
All of this code means that if the player types in "YES" he will be sent to "situation1"; if he types in "NO" he will be sent to "situation2"; if he types in neither "YES" or "NO" he will be sent back to the start of the question.
Remember when I said earlier that the order you write your code matters? If you typed in the "neq YES" code before the "equ NO" code, your player would never be able to make it to "situation 2".
Here is a good example of how you can use "set /p", "goto", and "if" all together.

Saving

The last thing I need to show you how to do is to save your file. Once you are all done, click the "file" button at the top of the screen, then click on "Save As." This will display a window where you can then create a name for you game and save it wherever you would like. However, you need to make sure that you save it as a Batch (.bat) file and not as a regular text file (.txt).
To do this, after you type in the name of your game add .bat behind it. You then need to go to "Save as type" and select "All Files."
Then you're done! All you have to do is hit the "save" button.
Remember, you can edit your game at any time by right clicking on the batch file and selecting "edit."
Select "All Files", then click the save button to finish.

Conclusion

It's as easy as that! With only the few short commands that I taught you (@echo off, echo, cls, pause, color, goto, etc.) you can be on your way to making very large and complex text-based games. Always double check your code to make sure that you typed everything correctly, and if you have any questions feel free to leave a comment and I'll get back to you as soon as I can. Good luck and have fun!
Fix Error Code 0x80073cf9 in Windows 8 while Installing App


App Store had introduced Windows 8 in the recent Redmond Operating System for downloading an application or software from it. Windows 8 has an additional function to run applications and software made for the previous Windows but do not have compatibility with the Windows’ Metro Display.
Windows 8 Error Code FixingPresently a lot of people are complaining that they are unable to download the apps from the app store of Windows 8, instead some unidentified messages appear on their screen with some weird codes such as 0x80073cf9.
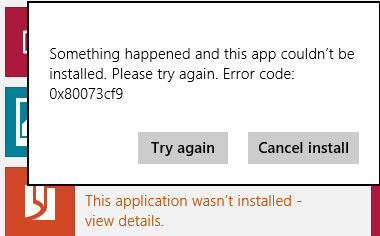
Error Code Fixing in Windows 8When the people get the following error message, they can use only two options “Cancel downloading process” or “Try Again” and if they hit the option “Try Again”, the similar message will appear again and again before them. So, below are some solutions you can try to resolve the problem.
4 Methods to Fix Error Code 0x80073cf9 in Windows 8 while Installing App

Method 1 to Fix Error Code 0x80073cf9

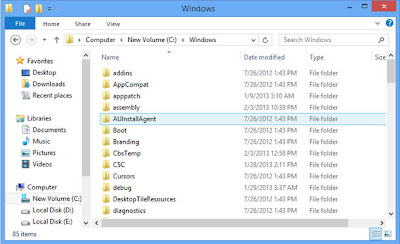
This technique helped a lot of users almost every time. If you want to resolve the error code 0x80073cf9, work through C:Windows and browse a folder known as AUInstallAgent. If you are unable to get it, you need to create it by yourself.

AUInstallAgent


Method 2 to Fix Error Code 0x80073cf9

You should turn off your security software or antivirus and firewall and try to download your required app again.

Method 3 to Fix Error Code 0x80073cf9

You should move to C:Program Files and make a folder as “Windows Apps”. Once you have created the folder, restart your system.

Method 4 to Fix Error Code 0x80073cf9

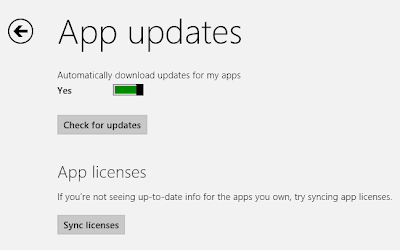
If you want to fix this issue, you can also Sync the app.
App Updates
  • Just press the “Windows” key and click to “Start” menu.
  • Now open the Store.
  • Press Windows + I at once. You will see a green colored catalogue appearing on the right corner.
  • You will find some options in it. Select the option “App Updates”.
  • Select the “Sync license”.
Surely you will be able to fix the error 0x80073cf9 with the help of the techniques given above and if no technique works properly and you are getting the error message again and again, you need to adopt only one option to solve the issue. You have to reinstall the windows 8
.

Friday 29 November 2013

What You Need to Know About Using UEFI Instead of the BIOS

What You Need to Know About Using UEFI Instead of the BIOS

windows-8-boot-options-menu
New Windows 8 PCs don’t include the traditional BIOS. They use UEFI firmware instead, just as Macs have for years. How you go about doing common system tasks has changed.
If you’re interested in why UEFI is replacing the BIOS, take a look at our overview of UEFI and how it’s different from the traditional BIOS.

You’ll Need to Access These Options From Within Windows


Rather than have modern PCs wait several seconds for a key press and delay their speedy boot process, you’ll have to access aboot options menu after booting into Windows.
To access this menu, open the Settings charm — either swipe in from the right and tap Settings or press Windows Key + I. Click the Power option under the Settings charm, press and hold the Shift key, and click Restart. Your computer will reboot into the boot options menu.
restart-from-settings-charm

Access Low-Level UEFI Settings

To access the UEFI Firmware Settings, which are the closest thing available to the typical BIOS setup screen, click the Troubleshoot tile, select Advanced Options, and select UEFI Firmware Settings.
access-uefi-firmware-settings
Click the Restart option afterwards and your computer will reboot into its UEFI firmware settings screen.
You’ll find different options here on different computers. For example, only a few options are available on Microsoft’s Surface Pro PC, but many more options will likely be available on traditional desktop PCs.
surface-pro-2-uefi
UEFI applies to new computers. You won’t see the UEFI Firmware Settings option here if you installed Windows 8 on an older computer that came with a BIOS instead of UEFI — you’ll just have to access the BIOS in the same way you always have.
Note that this boot menu option option may not be present on all UEFI PCs. On some UEFI PCs, you may have to access the UEFI settings screen in a different way — check your PC’s documentation for instructions if you don’t see the button here.

Disable Secure Boot


The UEFI settings screen allows you todisable Secure Boot, a useful security feature that prevents malware from hijacking Windows or another installed operating system. However, it can also prevent other operating systems — including Linux distributions and older versions of Windows like Windows 7 — from booting and installing.
You can disable Secure Boot from the UEFI settings screen on any Windows 8 PC. You’ll be giving up the security advantages Secure Boot offers, but you’ll gain the ability to boot any operating system you like.
secure-boot-violation-invalid-signature-detected

Boot From Removable Media

To boot your computer from removable media — for example, to boot a Linux live USB drive — you’ll need to access the boot options screen. Select the Boot Device option and choose the device you want to boot from. Depending on the hardware your computer has, you’ll see a variety of options like USB drive, CD/DVD drive, SD card, network boot, and so on.
windows-8-uefi-choose-boot-device

Legacy BIOS Mode

Many computers with UEFI firmware will allow you to enable a legacy BIOS compatibility mode. In this mode, the UEFI firmware functions as a standard BIOS instead of UEFI firmware. This can help improve compatibility with older operating systems that weren’t designed with UEFI in mind — Windows 7, for example.
If your PC has this option, you’ll find it in the UEFI settings screen. You should only enable this if necessary.

Change the System Time

The BIOS has generally included a built-in clock that displays the time and allowed users to change it from the BIOS settings screen. PCs with UEFI still contain hardware clocks that work the same way, but may not give you an option to control this in the UEFI settings screen. This doesn’t really matter — change the time in your operating system and it will change the system clock time, too.
change-system-clock

Access Hardware Information

Your UEFI settings screen may or may not offer the ability to view information about the hardware inside your computer and its temperatures. If it doesn’t, this doesn’t really matter — you can always view this information with a system information tool in Windows, such asSpeccy.
hardware-information-windows-8

Change Hardware Settings

The BIOS has traditionally offered a variety of settings for tweaking system hardware —overclocking your CPU by changing its multipliers and voltage settings, tweaking your RAM timings, configuring your video memory, and modifying other hardware-related settings. These options may or may not be present in your hardware’s UEFI firmware. For example, on tablets, convertibles, and laptops, you may not find any of these settings. On desktop motherboards designed for tweakers, you should hopefully find these settings in your UEFI settings screen.

While the methods of accessing the UEFI settings screen and booting from removable devices are both different, not much else has changed. Just as the BIOSes included with typical laptops offered fewer options than the BIOSes include with motherboards intended for enthusiasts, the UEFI firmware settings screens on tablets and convertibles offer fewer options than those on UEFI-enabled desktops.

How to Make the Windows Desktop Work Well on High-DPI Displays and Fix Blurry Fonts

How to Make the Windows Desktop Work Well on High-DPI Displays and Fix Blurry Fonts

tiny-elements-on-windows-desktop-on-high-dpi-display
After Windows users have watched smartphones, tablets, and even Mac laptops get high-density displays, they’re finally arriving on new Windows laptops. But be careful what you wish for — many desktop apps have problems on high-DPI displays.
Windows has had some support for DPI scaling, but few desktop programs took advantage of it. Now, the Windows desktop has a teething problem — just as it did when Microsoft originally instituted UAC.

Upgrade to Windows 8.1


Windows 8.1 offers much improved display scaling for high-density displays. If you’re using Windows 8, the free updrade to Windows 8.1 is a no-brainer. If you’re still using Windows 7 — well, you shouldn’t use Windows 7 on a high-density display. New laptops with high-density displays will come with Windows 8.1 — stick with Windows 8.1 and don’t try downgrading them. Windows 8.1 can be configured to work much more nicely on a desktop system and has much better support for high-DPI displays.
Windows 8.1 automatically chooses the correct display scaling settings for each display based on its pixel density and resolution. You can also have independent scaling settings for each display — so if you plug in an external monitor, Windows will automatically choose the correct scaling level. Previous versions of Windows would force the same scaling setting on each connected monitor.

Control System-Wide Display Scaling

If your laptop, convertible, or tablet came with a high-density display, Windows 8.1 will automatically choose an appropriate scaling setting for it. However, you may still want to modify the scaling setting if you’d like elements on your screen to appear smaller or larger.
To access this setting, right-click the Windows desktop background and select Screen resolution. Click the “Make text and other items larger or smaller” link in the Screen resolution window and you’ll be able to set a custom scaling level for your display.
windows-8.1-desktop-scaling
Unlike on previous versions of Windows, you shouldn’t have to log out and log back in after changing this setting — your change will take effect immediately.

Fix Blurry Fonts in Specific Applications

Many third-party desktop applications have blurry fonts when scaling is used. Windows 8.1 enables DPI scaling for all desktop apps, and ones that aren’t high-DPI aware will have blurry or fuzzy text, especially when they’re blown up to 200%.
Theoretically, this applies only to “older” applications that aren’t aware of DPI scaling. In practice, this problem applies to many extremely popular desktop applications like Google Chrome and Steam.
To fix this problem, you can disable display scaling for specific apps. To do so, right-click the desktop application’s shortcut and select Properties. If the application is on the taskbar, right-click the taskbar icon, right-click the application’s name, and select Properties.
make-fonts-appear-not-blurry
Click the Compatibility tab and click the “Disable display scaling on high DPI settings” checkbox. After you do, close the application and re-open it.
fix-blurry-fonts-on-windows-8.1
Fonts will no longer appear blurry in the application, but graphical elements will likely be much smaller. This is a trade-off you’ll have to make. Depending on the program, you may be able to enlarge fonts and other graphical elements in its preferences window to make them appear larger and compensate for the loss of proper scaling,
You could also just disable DPI scaling system-wide by selecting 100% scaling in the control panel screen above. If you did this, everything would appear smaller. Whether this is acceptable depends on how pixel-dense your screen is and how good your eyesight is.

Fix Google Chrome

As of version 31 on Windows 8.1, Chrome is currently very broken on high-DPI displays. Hopefully, you’re reading this some time in the future and Chrome has been updated to fix all these problems. If it hasn’t, here’s how we fixed these problems in Chrome 31.
First, go into the Chrome shortcut’s properties window and enable the Disable display scaling on high DPI settings option.
chrome-disable-dpi-scaling
Restart Chrome and everything will appear sharp, but very tiny. This isn’t good enough. Type chrome://flags into Chrome’s location bar and press Enter to access the hidden Flags page.
Scroll down to locate the Touch Optimized UI setting, set it to Enabled, and then relaunch Chrome. (There’s also a HiDPI Support setting in the Flags list — ignore it for now, as it seems to result in many graphical glitches in Chrome’s interface.)
chrome-enable-touch-optimized-ui
Next, open Chrome’s Settings page. Scroll down and click the Show advanced settings option, then scroll down to the Web content section
Set the default page zoom level to either 150% or 125%, depending on your screen resolution and eyesight. This will make everything on web pages appear larger — not just text, but images and other elements.
chrome-make-fonts-bigger
Chrome should now be fixed. Internet Explorer and Mozilla Firefox both appear to work okay without any tweaking needed, so you could also try one of them.
Remember that you can adjust font sizes on each individual web page. To do so, hold Ctrl and press the + or – keys, hold Ctrl and scroll the mouse wheel up or down, or use the zoom options in Chrome’s menu.

Windows 8-style apps actually scale nicely to high-density displays and offer crisp text and images without any of the bugs you’ll find on the desktop. Using Windows 8 apps would be a great way to avoid all the problems with the desktop — if there were enough apps available. Switching to the new Windows 8 interface will be a non-starter for most people, especially since Microsoft doesn’t even offer versions of its own Office apps for the new interface.

How to Fix Mouse Lag in PC Games on Windows 8.1

How to Fix Mouse Lag in PC Games on Windows 8.1

gaming-mouse
Windows 8.1 allows Windows to work better on high-DPI displays. As part of this, the way Windows deals with mice has changed. Games that don’t read raw mouse data may end up with laggy, freezing, or stuttering mouse movement.
This problem seems to primarily affect users with high-DPI or high-polling rate mice — in other words, gaming mice. Microsoft has only released a partial fix, but there’s a way to fix this problem in any affected game.

Install Microsoft’s Patch

Microsoft provides a patch that introduces a new compatibility option to fix this problem. As part of the patch, the compatibility option is applied to a variety of popular games, including games from the Call of Duty series, Counter Strike series, Deus Ex: Human Revolution, Hitman Absolution, Half-Life 2, Metro 2033, Portal, and Tomb Raider.
This patch is known as KB2908279. As of November 14, 2013, this patch has not been rolled out via Windows Update. To get the fix, you’ll have to download the patch from Microsoft’s website and install it manually.
Depending on the version of Windows 8.1 you’re using, you’ll need to download either thethe 64-bit version of this patch or the 32-bit version.
If you’re not sure which version of Windows you’re using, press the Windows key to access the Start screen, type System, and click the System shortcut. Scroll down and look at the System type line.

Fix Other Games via the Registry

The patch above does two things. One, it creates a new type of compatibility flag in Windows. Two, it applies that compatibility flag to some of the most popular games affected by this problem.
If you have a less-popular game with this problem, you’ll need to apply the compatibility option to the game on your own. Microsoft advises game developers to do this themselves so their users won’t have to, but many games may never be updated with this fix.
You can apply Microsoft’s fix to any affected game from the registry editor. Note that you must have the patch above installed for this to work.
To get started, press Windows Key + R to open the Run dialog, type regedit, and press Enter.
Browse to the following registry key, or folder:
HKEY_LOCAL_MACHINE\SOFTWARE\Microsoft\Windows NT\CurrentVersion\AppCompatFlags\Layers
The Layers key may not exist. If it doesn’t, right-click the AppCompatFlags key, point to New, select Key, type Layers, and press Enter to create it.
You’ll now need to create a new registry entry for your game. Right-click the Layers key, point to New, click String Value, type the full path of the game’s executable file, and press Enter. For example, if the game was located at C:\Program Files (x86)\Game\Engine.exe, you’d just type the following value:
C:\Program Files (x86)\Game\Engine.exe
Next, right-click the value you just created and select Modify. Type the following text into the box and press Enter:
NoDTToDITMouseBatch
You can now repeat this process to add every affected game you have.
Next, we’ll need an elevated Command Prompt window. To do this, press the Windows key to access the Start screen, type Command Prompt, right-click the Command Prompt shortcut that appears, and select Run as administrator.
In the elevated Command Prompt window, type the following command and press Enter to apply your compatibility settings:
Rundll32 apphelp.dll,ShimFlushCache

Warnings

Microsoft warns that this option will cause increased power usage, so you shouldn’t apply this option to unaffected games or other programs. In particular, they stress that this shouldn’t be applied to background processes that remain running, or your battery life will be noticeably affected.
There is another option Microsoft recommends — if the game In question has a “raw input” or DirectInput option, you can select it and the problem should be fixed.

How to Backup and Restore Signatures in Outlook 2013

How to Backup and Restore Signatures in Outlook 2013


00_lead_image_backup_signatures
You’ve created several signatures that you use for various types of emails. Then, you get a new machine and have to set up Windows and all your programs again. However, you can easily preserve your signatures in Outlook and restore them to the new machine.
Signatures are not stored in the .pst file Outlook uses for email messages. They are stored in the following location:
C:\Users\%username%\AppData\Roaming\Microsoft\Signatures
There is an easy way to open this location from within Outlook. Click the File tab.
On the Account Information screen, click Options in the list of menu items on the left.
Click Mail in the list of menu items on the left side of the Outlook Options dialog box.
In the Compose messages section, press Ctrl while clicking on the Signatures button.
The Signatures folder opens in Windows Explorer. To backup your signatures, simply copy all the files in this folder to another location.
To restore your signatures, copy them from your backup location back into the C:\Users\%username%\AppData\Roaming\Microsoft\Signatures location. The next time you open Outlook, your saved signatures will be available. If you had signatures selected as default signatures for new emails and for replies and forwards, you’ll have to define those again.
NOTE: Each signature you create in Outlook exists in three formats: Plain Text (.txt), HTML (.htm), and Rich Text (.rtf). You need to backup all these formats for each signature.

How to Import Multiple Contacts into Outlook 2013 From a Single vCard (.vcf) File in Windows 8

How to Import Multiple Contacts into Outlook 2013 From a Single vCard (.vcf) File

00_lead_image_export_multiple

If you have multiple contacts stored in a single .vcf file, and you try to import that file into Outlook, only the first contact will be imported. There is a way around this limitation that allows you to import all contacts from a single .vcf file.


First, you must convert the .vcf file to a .csv file that can be imported into Outlook. This can be done using the Windows Contacts folder that has been available since Windows Vista. You can import the .vcf file into the Contacts folder and then export the contacts into a .csv file. See our article for details on how to do this.
Once you have your .csv file, open Outlook and click the File tab.
01_clicking_file_tab
On the Account Information screen, click Open & Export in the list of options on the left.
02_selecting_open_and_export
On the Open screen, click Import/Export.
03_clicking_import_export
On the Import and Export Wizard, select Import from another program or file from the Choose an action to perform list. Click Next.
04_import_from_another_program
On the Import a File dialog box, select Comma Separated Values from the Select file type to import from list and click Next.
05_comma_separated_values
On the next screen, click Browse.
06_clicking_browse
On the Browse dialog box, navigate to the folder containing the .csv file you want to import. Select the file and click OK.
07_selecting_csv_file
Select an option to indicate what to do when duplicate entries are encountered and click Next.
08_selecting_options
Select Contacts from the Select destination folder tree to specify where to put the imported contacts. Click Next.
09_selecting_contacts
A summary screen displays telling you what actions will be performed. Use the Change Destination button to change the location in Outlook to which the contacts will be saved.
NOTE: The Map Custom Fields button opens a dialog box that allows you to specify which fields in the .csv file correspond to which fields in Outlook. The default mapping is usually sufficient to import the information.
10_clicking_finish
Once you’ve imported the contacts, click the People icon on the navigation bar at the bottom of the Outlook window.
11_clicking_people
You’ll see the contacts listed in the Contacts folder. You can select a different view, such as Business Card, in the Current View section of the Home tab.
12_contacts_in_outlook
If you’re using Outlook 2010, you can import contacts directly from the Windows Contacts folder without exporting them to a .csv file first.