Saturday, 30 November 2013

Fix Error Code 0x80073cf9 in Windows 8 while Installing App


App Store had introduced Windows 8 in the recent Redmond Operating System for downloading an application or software from it. Windows 8 has an additional function to run applications and software made for the previous Windows but do not have compatibility with the Windows’ Metro Display.
Windows 8 Error Code FixingPresently a lot of people are complaining that they are unable to download the apps from the app store of Windows 8, instead some unidentified messages appear on their screen with some weird codes such as 0x80073cf9.
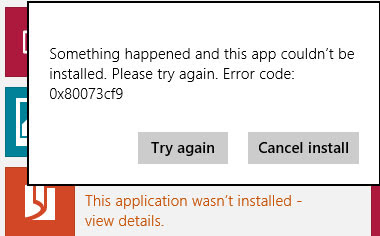
Error Code Fixing in Windows 8When the people get the following error message, they can use only two options “Cancel downloading process” or “Try Again” and if they hit the option “Try Again”, the similar message will appear again and again before them. So, below are some solutions you can try to resolve the problem.
4 Methods to Fix Error Code 0x80073cf9 in Windows 8 while Installing App

Method 1 to Fix Error Code 0x80073cf9

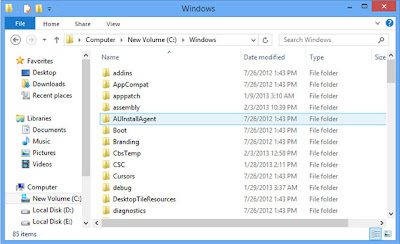
This technique helped a lot of users almost every time. If you want to resolve the error code 0x80073cf9, work through C:Windows and browse a folder known as AUInstallAgent. If you are unable to get it, you need to create it by yourself.

AUInstallAgent


Method 2 to Fix Error Code 0x80073cf9

You should turn off your security software or antivirus and firewall and try to download your required app again.

Method 3 to Fix Error Code 0x80073cf9

You should move to C:Program Files and make a folder as “Windows Apps”. Once you have created the folder, restart your system.

Method 4 to Fix Error Code 0x80073cf9

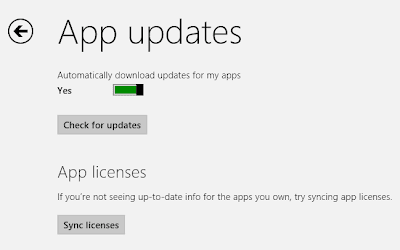
If you want to fix this issue, you can also Sync the app.
App Updates
  • Just press the “Windows” key and click to “Start” menu.
  • Now open the Store.
  • Press Windows + I at once. You will see a green colored catalogue appearing on the right corner.
  • You will find some options in it. Select the option “App Updates”.
  • Select the “Sync license”.
Surely you will be able to fix the error 0x80073cf9 with the help of the techniques given above and if no technique works properly and you are getting the error message again and again, you need to adopt only one option to solve the issue. You have to reinstall the windows 8
.

Friday, 29 November 2013

What You Need to Know About Using UEFI Instead of the BIOS

What You Need to Know About Using UEFI Instead of the BIOS

windows-8-boot-options-menu
New Windows 8 PCs don’t include the traditional BIOS. They use UEFI firmware instead, just as Macs have for years. How you go about doing common system tasks has changed.
If you’re interested in why UEFI is replacing the BIOS, take a look at our overview of UEFI and how it’s different from the traditional BIOS.

You’ll Need to Access These Options From Within Windows


Rather than have modern PCs wait several seconds for a key press and delay their speedy boot process, you’ll have to access aboot options menu after booting into Windows.
To access this menu, open the Settings charm — either swipe in from the right and tap Settings or press Windows Key + I. Click the Power option under the Settings charm, press and hold the Shift key, and click Restart. Your computer will reboot into the boot options menu.
restart-from-settings-charm

Access Low-Level UEFI Settings

To access the UEFI Firmware Settings, which are the closest thing available to the typical BIOS setup screen, click the Troubleshoot tile, select Advanced Options, and select UEFI Firmware Settings.
access-uefi-firmware-settings
Click the Restart option afterwards and your computer will reboot into its UEFI firmware settings screen.
You’ll find different options here on different computers. For example, only a few options are available on Microsoft’s Surface Pro PC, but many more options will likely be available on traditional desktop PCs.
surface-pro-2-uefi
UEFI applies to new computers. You won’t see the UEFI Firmware Settings option here if you installed Windows 8 on an older computer that came with a BIOS instead of UEFI — you’ll just have to access the BIOS in the same way you always have.
Note that this boot menu option option may not be present on all UEFI PCs. On some UEFI PCs, you may have to access the UEFI settings screen in a different way — check your PC’s documentation for instructions if you don’t see the button here.

Disable Secure Boot


The UEFI settings screen allows you todisable Secure Boot, a useful security feature that prevents malware from hijacking Windows or another installed operating system. However, it can also prevent other operating systems — including Linux distributions and older versions of Windows like Windows 7 — from booting and installing.
You can disable Secure Boot from the UEFI settings screen on any Windows 8 PC. You’ll be giving up the security advantages Secure Boot offers, but you’ll gain the ability to boot any operating system you like.
secure-boot-violation-invalid-signature-detected

Boot From Removable Media

To boot your computer from removable media — for example, to boot a Linux live USB drive — you’ll need to access the boot options screen. Select the Boot Device option and choose the device you want to boot from. Depending on the hardware your computer has, you’ll see a variety of options like USB drive, CD/DVD drive, SD card, network boot, and so on.
windows-8-uefi-choose-boot-device

Legacy BIOS Mode

Many computers with UEFI firmware will allow you to enable a legacy BIOS compatibility mode. In this mode, the UEFI firmware functions as a standard BIOS instead of UEFI firmware. This can help improve compatibility with older operating systems that weren’t designed with UEFI in mind — Windows 7, for example.
If your PC has this option, you’ll find it in the UEFI settings screen. You should only enable this if necessary.

Change the System Time

The BIOS has generally included a built-in clock that displays the time and allowed users to change it from the BIOS settings screen. PCs with UEFI still contain hardware clocks that work the same way, but may not give you an option to control this in the UEFI settings screen. This doesn’t really matter — change the time in your operating system and it will change the system clock time, too.
change-system-clock

Access Hardware Information

Your UEFI settings screen may or may not offer the ability to view information about the hardware inside your computer and its temperatures. If it doesn’t, this doesn’t really matter — you can always view this information with a system information tool in Windows, such asSpeccy.
hardware-information-windows-8

Change Hardware Settings

The BIOS has traditionally offered a variety of settings for tweaking system hardware —overclocking your CPU by changing its multipliers and voltage settings, tweaking your RAM timings, configuring your video memory, and modifying other hardware-related settings. These options may or may not be present in your hardware’s UEFI firmware. For example, on tablets, convertibles, and laptops, you may not find any of these settings. On desktop motherboards designed for tweakers, you should hopefully find these settings in your UEFI settings screen.

While the methods of accessing the UEFI settings screen and booting from removable devices are both different, not much else has changed. Just as the BIOSes included with typical laptops offered fewer options than the BIOSes include with motherboards intended for enthusiasts, the UEFI firmware settings screens on tablets and convertibles offer fewer options than those on UEFI-enabled desktops.

How to Make the Windows Desktop Work Well on High-DPI Displays and Fix Blurry Fonts

How to Make the Windows Desktop Work Well on High-DPI Displays and Fix Blurry Fonts

tiny-elements-on-windows-desktop-on-high-dpi-display
After Windows users have watched smartphones, tablets, and even Mac laptops get high-density displays, they’re finally arriving on new Windows laptops. But be careful what you wish for — many desktop apps have problems on high-DPI displays.
Windows has had some support for DPI scaling, but few desktop programs took advantage of it. Now, the Windows desktop has a teething problem — just as it did when Microsoft originally instituted UAC.

Upgrade to Windows 8.1


Windows 8.1 offers much improved display scaling for high-density displays. If you’re using Windows 8, the free updrade to Windows 8.1 is a no-brainer. If you’re still using Windows 7 — well, you shouldn’t use Windows 7 on a high-density display. New laptops with high-density displays will come with Windows 8.1 — stick with Windows 8.1 and don’t try downgrading them. Windows 8.1 can be configured to work much more nicely on a desktop system and has much better support for high-DPI displays.
Windows 8.1 automatically chooses the correct display scaling settings for each display based on its pixel density and resolution. You can also have independent scaling settings for each display — so if you plug in an external monitor, Windows will automatically choose the correct scaling level. Previous versions of Windows would force the same scaling setting on each connected monitor.

Control System-Wide Display Scaling

If your laptop, convertible, or tablet came with a high-density display, Windows 8.1 will automatically choose an appropriate scaling setting for it. However, you may still want to modify the scaling setting if you’d like elements on your screen to appear smaller or larger.
To access this setting, right-click the Windows desktop background and select Screen resolution. Click the “Make text and other items larger or smaller” link in the Screen resolution window and you’ll be able to set a custom scaling level for your display.
windows-8.1-desktop-scaling
Unlike on previous versions of Windows, you shouldn’t have to log out and log back in after changing this setting — your change will take effect immediately.

Fix Blurry Fonts in Specific Applications

Many third-party desktop applications have blurry fonts when scaling is used. Windows 8.1 enables DPI scaling for all desktop apps, and ones that aren’t high-DPI aware will have blurry or fuzzy text, especially when they’re blown up to 200%.
Theoretically, this applies only to “older” applications that aren’t aware of DPI scaling. In practice, this problem applies to many extremely popular desktop applications like Google Chrome and Steam.
To fix this problem, you can disable display scaling for specific apps. To do so, right-click the desktop application’s shortcut and select Properties. If the application is on the taskbar, right-click the taskbar icon, right-click the application’s name, and select Properties.
make-fonts-appear-not-blurry
Click the Compatibility tab and click the “Disable display scaling on high DPI settings” checkbox. After you do, close the application and re-open it.
fix-blurry-fonts-on-windows-8.1
Fonts will no longer appear blurry in the application, but graphical elements will likely be much smaller. This is a trade-off you’ll have to make. Depending on the program, you may be able to enlarge fonts and other graphical elements in its preferences window to make them appear larger and compensate for the loss of proper scaling,
You could also just disable DPI scaling system-wide by selecting 100% scaling in the control panel screen above. If you did this, everything would appear smaller. Whether this is acceptable depends on how pixel-dense your screen is and how good your eyesight is.

Fix Google Chrome

As of version 31 on Windows 8.1, Chrome is currently very broken on high-DPI displays. Hopefully, you’re reading this some time in the future and Chrome has been updated to fix all these problems. If it hasn’t, here’s how we fixed these problems in Chrome 31.
First, go into the Chrome shortcut’s properties window and enable the Disable display scaling on high DPI settings option.
chrome-disable-dpi-scaling
Restart Chrome and everything will appear sharp, but very tiny. This isn’t good enough. Type chrome://flags into Chrome’s location bar and press Enter to access the hidden Flags page.
Scroll down to locate the Touch Optimized UI setting, set it to Enabled, and then relaunch Chrome. (There’s also a HiDPI Support setting in the Flags list — ignore it for now, as it seems to result in many graphical glitches in Chrome’s interface.)
chrome-enable-touch-optimized-ui
Next, open Chrome’s Settings page. Scroll down and click the Show advanced settings option, then scroll down to the Web content section
Set the default page zoom level to either 150% or 125%, depending on your screen resolution and eyesight. This will make everything on web pages appear larger — not just text, but images and other elements.
chrome-make-fonts-bigger
Chrome should now be fixed. Internet Explorer and Mozilla Firefox both appear to work okay without any tweaking needed, so you could also try one of them.
Remember that you can adjust font sizes on each individual web page. To do so, hold Ctrl and press the + or – keys, hold Ctrl and scroll the mouse wheel up or down, or use the zoom options in Chrome’s menu.

Windows 8-style apps actually scale nicely to high-density displays and offer crisp text and images without any of the bugs you’ll find on the desktop. Using Windows 8 apps would be a great way to avoid all the problems with the desktop — if there were enough apps available. Switching to the new Windows 8 interface will be a non-starter for most people, especially since Microsoft doesn’t even offer versions of its own Office apps for the new interface.